This easy to use exercise displays the key functions of the Measurement Tutor. Once this exercise is completed, students will be familiar and comfortable with the Tutor, giving them maximum benefit as they progress with their scientific studies. The best opportunity to learn occurs when mistakes are made – and that is when the full power of the Quantum Tutor is realized. To demonstrate the Tutor's capabilities and features, some of the more common errors made by students are a key focus of this exercise. The Measurement Tutor is one of the most flexible of all of the Quantum Tutors – it does not depend on knowing in advance the object being measured, therefore it is designed to help you with anything you would like to measure. Similar to a human tutor, the Quantum Tutor deliberately offers a variety of wordings and numbers in its examples and explanations every time you use it. The ideas and concepts are the same. So, be prepared – you may not see the exact same words or numbers that appear in these sample screens. Know that you are learning the concepts and the why behind the answers, not just memorizing facts and procedures. Teachers may choose to print out this document and use it as an assignment in the classroom or for homework. Space has been provided for students to write in their responses. Learning Objectives:
Overview of Exercise:Steps 1 through 5: Students enter a measurement, receive tutoring, and ask the Tutor questions relating to precision, accuracy, and the nature of measurement. Steps 6 and 7: Students take a measurement (or make an
approximation) and use the Tutor to help them explore common errors. Step 1: Getting StartedTo use this Activity, you will need to toggle back and forth between this page and the Measurement Tutor. You will have multiple windows open, and some windows may be hidden from view. If you are using a PC, look at the Windows toolbar to see which windows are running. Find the title of the window that you want, and click on the title to make that window the active window. If you are using a Mac, you may need to minimize all of the browser windows to find the one that you want. At any time you may click Instructions at the upper left of your screen for information about the operation of the Tutor. The main window will look like this: Figure 1: Measurement Tutor main window. You must "Choose a Measuring Device".The Tutor begins by asking what measuring instrument you are using. The menu allows you to select the instrument. For this exercise, let's select the meter stick. If you have an actual meter stick available, it would be helpful (though not essential) to have it with you for this exercise. In the menu, click on (highlight) meter stick and then click the green OK button to the right. You will see a window that looks like this: Figure 2: We're taking measurements with a meter stick. The Tutor is ready for your measurement.Step 2: Ask a questionNow that the Tutor knows that you are using a meter stick, it immediately gives you information. Even though you haven't entered a measurement yet, the Tutor can answer general questions about the meter stick you are using. In the Ask a Question box click once on "What is the maximum length in centimeters that should be measured using a meter stick?" and then click the green Ask button to the right. The results will look like this:
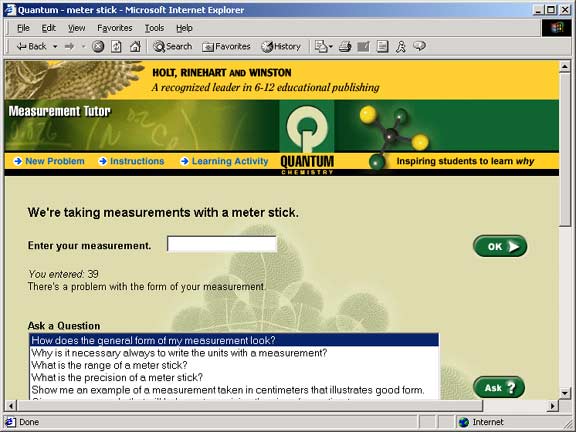
Figure 3: Ask a Question. The Tutor answers your question.In addition to helping you with actual measurements, the Tutor answers questions about the measuring device and the fundamental nature of measurement. Step 3: Enter your measurementThe Tutor allows you to enter your own measurement exactly as you would record it on your paper or lab report. Let's say we were measuring the width of your computer screen and we found it to be 39 centimeters. In the Enter your measurement box, enter 39:
Figure 4: Entering your measurement. Enter the numbers exactly as you would on your lab report.There is nothing apparently wrong with the number "39" as it is entered, but is it in the proper form for a measurement? Let's see how the Tutor responds. Click the green OK button and the Tutor will assess your measurement.
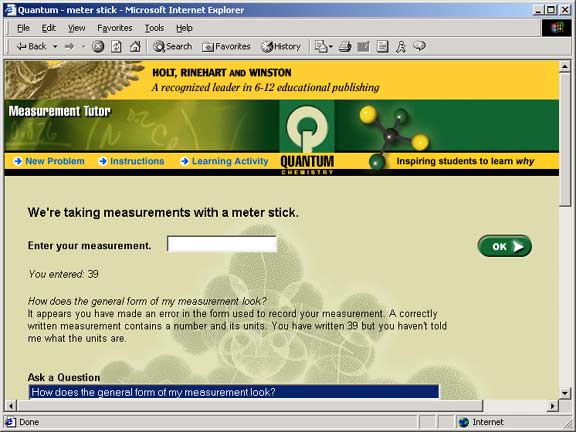
Figure 5: The Tutor responds to your entry.To find out why this is wrong, we can go to the Ask a Question box and click once on "How does the general form of my measurement look?" Click the green Ask button and you will see the Tutor's response. Figure 6: The Tutor answers the question: "How does the general form of my measurement look?"Now ask the question "Why is it necessary always to write the units with a measurement?" and see what the Tutor has to say.
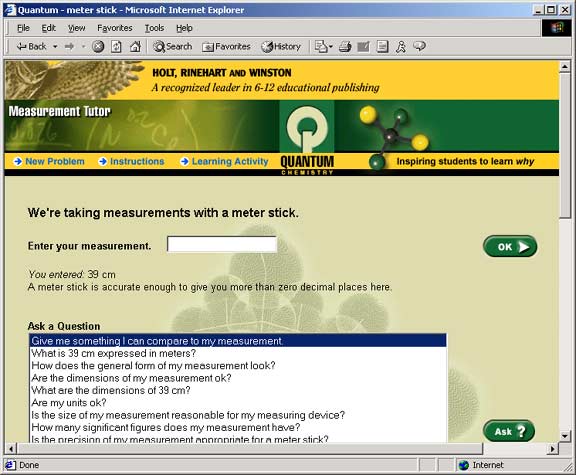
Figure 7: The Tutor answers the question: "Why is it necessary always to write the units with a measurement?"Reenter the measurement by typing 39 cm in the box and click the green OK button. Figure 8: The Tutor responds to your entry. Notice how the Ask a Question menu has changed.Step 4: Using the Tutor to revise and correct your measurementThe Tutor now provides a much longer list of questions it is ready to answer for you. This is encouraging, but the measurement you entered still has problems. For more detailed information about the remaining problem with the decimal places, ask the question: "How many significant figures does my measurement have?" Then ask the Tutor: "Is the precision of my measurement appropriate for a meter stick?" Reenter your measurement by typing 39.47 cm and clicking the green OK button. You will see a window that looks like this:
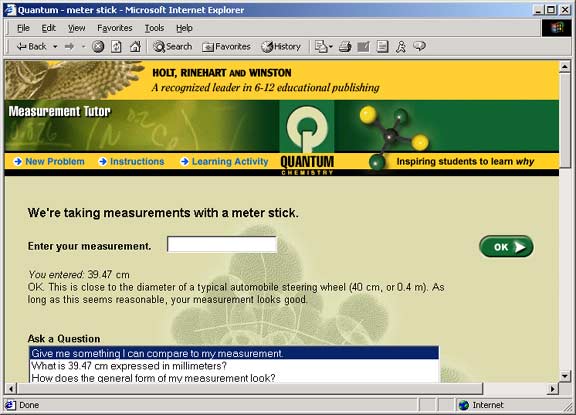
Figure 9: The Tutor helps you determine the accuracy of the measurement.Step 5: Determine the accuracy of your measurementEven though the Tutor doesn't know the actual object you are measuring, it provides information to assist you. Decide if the width of your computer screen is indeed near the diameter of an automobile steering wheel. The fact that the size of the object you measured matches very closely with the size of the item listed by the Tutor increases your confidence that your measurement has the accuracy necessary for a science activity. Step 6: Start a new problemTo try a new problem, click on the New Problem button, located in the upper left corner of the screen. Select meter stick as the measuring device and click the green OK button. If available, use your actual meter stick to measure some object near you, perhaps the height of the table where the computer sits. If you don't have a meter stick with you then make your best estimate of the height. This activity will be equally useful either way. The height of your computer table will be near the 73 mark on the meter stick. Let's suppose you were unfamiliar with the meter stick and were uncertain of the units used here. This device can be used to measure meters, centimeters, or millimeters so let's use the Tutor to help us decide which unit is correct. To see if the units are meters, enter 73 m in the box and click the green OK button. From the questions menu ask the question "Give me something I can compare to my measurement." (It may also be worded something like "How can I estimate the size of 73 m?") You will see a screen that looks like this:
Figure 10: The Tutor answers the question: "Give me something I can compare to my measurement."From the Tutor's response, it is clear that the 73 units are not meters. The height of the table is obviously nowhere near the length of two basketball courts. Now enter 73 cm and click the green OK button. Ask the same question again and review the Tutor's response. The Tutor replies that 73 cm is approximately twice the diameter of a large pizza. Centimeter is definitely the correct unit. The choice of unit this time probably wasn't in doubt, but as you progress in your study of the metric (or SI) system of measurement you are certain to have problems from time to time. Even more importantly, you will, from time to time, mistakenly record the wrong unit or misplace a decimal point. This is to be expected for beginning students, especially when you are making several measurements with different measuring devices for the same activity. Now that you are finished, scroll down to the bottom of the screen. There, you will see a record of every step you took and every question you asked of the Tutor.
Figure 11: The Tutor always displays the transcript.This record is a "transcript" of the work you did so far. It is always there if you need to review a question or step when you use the Tutor. You will find that reviewing this transcript is a very good use of your time. Step 7: Identifying other common errorsLet's see how the Tutor will help you identify some other common errors. Enter any measurement you wish and experiment with the Tutor until you feel completely comfortable with it. Entering intentional errors is one of the best ways to become familiar with the Tutor's features. Knowing in advance exactly what the error is enables you to interpret the Tutor's explanations much more quickly. After you have explored as many of the Tutor's features and questions as you need, try the following activities: Click the New Problem button, select meter stick as the measuring device, click the green OK button and enter 6.937 cm. Do you think there is a problem with this measurement or is the form correct? On the first line try to predict what the Tutor's response will be and click the green OK button. On the second line, summarize the Tutor's actual response. What about this measurement: 0.3 m? Your ability to make good observations about measurements should be improving by now. Again, on the first line try to predict what the Tutor's response will be and click the green OK button. On the second line, summarize the Tutor's actual response It is very important to remember that the form you are learning to use to record your measurements is the same one used by all scientists everywhere. It is a system that was developed over a long period of time and has been thoroughly tested. These tests have shown this technique to be completely appropriate for all applications. Isn't it interesting to know that you are using exactly the same system as the scientists at NASA who are recording detailed measurements from multi-million dollar space vehicles? The problems you have just completed illustrate many of the major features of the Quantum Tutors. The program has tutored you through an in-depth examination of measurement by encouraging you to bring together all related background information and concepts from both mathematics and science. As you entered your measurements you were tutored on choosing a measuring device, choice of dimensions, choice of units, the number of decimal places (significant figures), and the broader concept of the nature of measurement. The Tutor has encouraged you to think about the choice, application, and especially the limitations of the common measuring devices you are likely to have in your classroom. Your challenge is to continue to consider all factors encompassing the concepts of precision and accuracy before, during and after the process of making each measurement. This becomes especially important when assessing measurements recorded by another student. With these skills and concepts now clearly associated in your thinking you are much better equipped to handle problems involving scientific measurement. As you use the Tutor to assist you with other problems, begin to predict what the computer will do next and attempt to become increasingly aware of the various errors that may lurk in even the simplest measurements. When your predictions and explanations begin to match those of the Tutor, then you have mastered the concept of measurement. |
|